The answers to the questions posed in a previous post, titled Look Ma, no Photoshop!
First off, congratulations to Simon who was the first one to accurately describe all three techniques. Others (like Nick) were very close and even others should win for sheer creativity (like Carlie from Hogwarts).
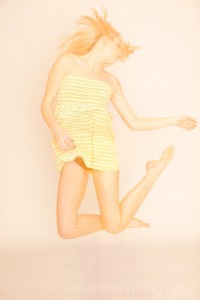
 Shot 1
2.0 sec at f / 3.5, ISO 200
The idea behind this effect is two-fold. The blur/movement effect and the crazy color combine to create an effect that looks mildly ethereal.
The movement is obvious, the long shutter speed combined with a front-curtain flash. Front curtain flash (usually a default setting) allowed me to push the shutter at the exact second she reached the top of her jump and the flash would freeze that moment, the two second drag gave some ghostly movement artifacts in the image.
The odd color is achieved by combining two separate light sources with different white balance, both light sources came from the same light. Most strobes actually have a modeling light and a flash, and each of these come from a separate bulb. Since the aperture was so wide the much warmer toned modeling light (set to maximum brightness) combined with the whiter light from the strobe (set to very low) sort of made any white balance setting look oddly other worldly.
An effect I exaggerated to it’s fullest! Thanks so much to Jillian for jumping around with such boundless energy.
Equipment List for Shot 1:
Canon 5D Mark II, Canon 70-200 f/2.8L IS USM, Elinchrom 300RX Monolight, Rotalux Midi Octa by Elinchrome (53″), Pocket Wizard Multimax 32 Channel (2)
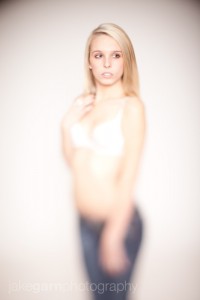
 Shot 2
1/160 at f / ?, ISO 100
The blur here is not caused by putting anything on or over the lens, it is all caused by the simplest idea of a really, really shallow depth of field.
Obviously Jillian is standing up straight and looks to be completely parallel to the front of the lens, which is why shallow depth of field doesn’t seem to be the only thing responsible for the blur. However, that requires us to assume the lens was properly attached to the camera… it wasn’t.
The technique is simple, I detached the lens and was tilting it away from the camera body. Focusing was quite tricky, since you really can’t twist the focus ring very easily I just tilted the lens back and forth until the plane of focus cut sharply across her face.
This technique, called free lensing, is starting to get pretty popular… you can also create this effect with tilt-shift lenses or lens babies (which I think I’m going to review soon on my blog). This particular image was created with a 50mm prime lens from Canon.
Equipment List for Shot 2:
Canon 5D Mark II, Canon 50mm 1.2L, Elinchrom 300RX Monolight, Rotalux Midi Octa by Elinchrome (53″), Pocket Wizard Multimax 32 Channel (2)
 Shot 3
2.5 sec at f /6.3, ISO 160
This one looks just like multiple exposures on one negative. A common technique back when it was required to use film cameras, not just trendy. Zing! 🙂
However, most digital cameras (including the Canon 5D Mark II) do not support multiple exposures on one frame, which means I used the other way to accomplish this. Multiple flashes.
In a completely dark room, with the modeling light off, I fired the flash three times during the 2.5 second exposure… poor Jillian had to make this movement right around a billion times before I was happy.
Jillian is such a great sport!
Equipment List for Shot 3:
Canon 5D Mark II, Canon 50mm 1.2L, Elinchrom 300RX Monolight, Rotalux Midi Octa by Elinchrome (53″), Pocket Wizard Multimax 32 Channel (2)

Woot ! What’s my prize ?
@Simon – You get to come sand and re-paint the cyc in my studio! I’ll even give you an apple Tom Sawyer style. And for future reference you should try and find out what the prize is BEFORE you win. Total rookie mistake! 😉
Seriously, if I wasn’t 2,230 miles away from Salt Lake City (in Montreal, QC), I would come and HELP you re-paint your cyc… if I could shoot on it too ! 😛
And you got me checking on the web for the Tom Sawyer reference (haven’t read this story for decades). Nice try !
The Tom Sawyer reference may be a little vague, remember when he tricked his pals into painting the fence for him while he sat and ate an apple? 🙂
Dang! I was so sure I was right about the first shot. Oh well, live and learn.
Well done Simon! Enjoy your apple.